 Property Listing Promotion
How to take real estate photos in the order buyers see them
Real estate photography tips built around a 25-shot list in gallery order: where to stand in each room, and how to frame shots that still work as a Reel.

The seller has the house ready at ten. You walk it the way you'd show it: front door, living room, kitchen, upstairs, out the back. An hour later you have forty photos, and the front of the house, the photo every buyer sees first, was taken with the sun behind the roof.
The camera did its job. The order didn't. A listing gallery has a fixed running order that starts with the front exterior. Plan the shoot and the upload in that order, the order buyers see them, and shoot in whatever order the light allows. These real estate photography tips give you the list, where to stand for each shot, and one framing rule that keeps the same photos usable when you cut them down for a Reel. They work with a camera or a phone. If you're shooting on an iPhone, our guide to iPhone listing photos covers the camera settings and the prep list.
How do you take real estate photos?
Start with the front exterior, then work through about 25 shots room by room, standing in corners and doorways with the camera level at chest height and every light on. Plan the list in the order buyers will see the gallery, but shoot each room when its light is best.
What photos do you need for a real estate listing?
About 25 for a three-bedroom, two-bath house: one strong frame of every space a buyer will ask about, in the order the gallery will run. That sits inside the range NWMLS gives its members, which caps uploads at 40 but says to aim for 20 to 30 images.
The list below is ours, built for that size of house. Add a line for every feature the listing remarks mention, and cut the rooms the house doesn't have. Shoot more than one frame of each, and keep the best one.
The 25-shot list for a three-bedroom, two-bath house, in gallery order
| Shot | Where to stand | What it has to show |
|---|---|---|
| 1. Front exterior, straight on | At the curb or across the street | The whole front, roofline to driveway. This is photo one. |
| 2. Front exterior, angled | At a front corner of the lot | Two sides of the house, so a buyer sees its depth |
| 3. Front door and porch | At the bottom of the walk or the porch steps | The approach: door, porch, lighting |
| 4. Entry, looking in | Just inside the front door | What a buyer sees on walking in, and where it leads |
| 5. Living room, wide | The corner farthest from the main window, or the doorway | Two or three walls and the room's main feature |
| 6. Living room, reverse | The opposite corner | The other half of the room and the way into the next space |
| 7. Kitchen, wide | The doorway or the end of the island | The whole working layout: counters, appliances, island |
| 8. Kitchen, looking out | The far side of the kitchen | How it opens to where people eat or sit |
| 9. Kitchen feature | Close, at counter height | The thing the remarks will mention: the range, the island, the pantry |
| 10. Dining area | A corner, with the table in the middle of the frame | Seating size and the link to the kitchen |
| 11. Family room, office or flex room | The doorway | What the room is for, staged as one thing |
| 12. Primary bedroom, wide | The corner by the door | Bed, windows and room size |
| 13. Primary bedroom, second angle | Beside the bed, facing back toward the door | The closet, the bathroom door or the view |
| 14. Primary bath, wide | The doorway | The layout: vanity, shower, tub |
| 15. Primary bath feature | Angled off the mirror so you're not in it | The double vanity, the shower or the tub |
| 16. Primary closet | The doorway, if it's a walk-in | Storage |
| 17–18. Bedrooms 2 and 3, one shot each | The corner by the door | Size and light |
| 19. Second bathroom | The doorway | The layout. One shot is enough. |
| 20. Laundry room or mudroom | The doorway | That it exists, and where it is |
| 21. Backyard, toward the house | A back corner of the yard | Yard size and the back of the house in one frame |
| 22. Patio or deck | From the yard, or from one edge of the deck | The outdoor space, set up the way someone would use it |
| 23. The outdoor feature | Wherever it shows in context | The pool, the garden or the view |
| 24. Garage and driveway | The end of the driveway | Parking and the garage door, closed |
| 25. One interior detail | Close, at the height you'd notice it | The fireplace, the built-ins or the new floors |
The list gives the front, the main living spaces and the primary suite more than one angle, and every other room one. A second shot of a secondary bedroom tells a buyer nothing the first one didn't, and it pushes the photos that matter further down the gallery.
Which photo should you take first?
The front exterior, because it's photo one. In Florida, Stellar MLS requires the front exterior photo in the 1st photo slot on all property types (an aerial or water-view shot can take slot one, and then the front goes second), and a listing won't go active until a front exterior, aerial or water view is loaded. NWMLS in Washington is looser but lands in the same place: typically an exterior shot is used as the primary photo.
Your own board may word it differently, so search its rules or help pages for "primary photo" or "first photo" before the shoot. That makes the front the one shot you can't fix later by reordering the gallery. It's also the one most at the mercy of the light, because you can't move the sun and you can't move the house.
Get the front exterior right before anything else
- Check which way the front faces before you book the shoot. A house facing east has its front lit in the morning, and a house facing west in the afternoon.
- Cars out of the driveway, bins out of sight, garage door closed.
- Your own sign down or out of frame. Stellar MLS's listing content rule says the broker's yard signage "may not be visible in the photo/image", and our guide to MLS photo requirements covers what other boards enforce.
- If the sun is behind the house at your appointment time, shoot the inside first and come back for the front later, or at dusk with the lights on: NWMLS's guide says exterior shots are best at dusk. Don't upload a front you know is wrong.
What order should you shoot the rooms in?
By light, not by the floor plan. Plan the list in gallery order, then shoot each side of the house while direct sun isn't coming through its windows.
Direct sun through a window throws a bright patch across the floor and leaves the rest of the room dark. Expose for the patch and the room goes dark; expose for the room and the patch turns white. A phone's HDR, or several exposures blended on a camera, narrows that gap, but a room on the shaded side of the house starts with soft, even light and needs neither. If you can't wait for the sun to move, close the blinds on the sunlit window and shoot with the room's own lights on. So the order you shoot in usually runs the opposite way to the sun: rooms on the shaded side first, then the rest as the sun moves round. The gallery order doesn't change. You're only changing which room you stand in at 10:30.
Before the first frame, walk the house once with the list in your hand. Turn on every light, lamps included, switch off fans and TVs, and open the blinds. The full prep list is in our iPhone listing photos guide, and it applies whatever you shoot on.
Where should you stand to photograph a room?
In a corner or a doorway, with the camera level at about chest height and two or three walls in the frame. Step back before you go wider, so the room keeps its real size in the photo.
That last rule is the easiest one to break. A wider lens, or a phone's 0.5x, fits more of the room in by stretching what sits near the edges, so a small bedroom photographs bigger than it is. NWMLS warns its members that wide-angle lenses can portray an unrealistic sense of size. Back into the far corner or out through the doorway first, and reach for the wider lens only when there's nowhere left to stand.
Keep the camera level, not tilted. Tilting down to get more floor in makes every vertical line in the room lean inward, and it's what makes door frames look crooked in listing photos. If you need more floor, lower the camera and keep it level.
Where to stand, by room
| Room | Where to stand | What to watch |
|---|---|---|
| Living room and kitchen | The far corner, or the doorway, for the wide shot. The opposite corner for the reverse. | Kitchens read best with the camera a little above counter height, so the counters don't block the floor. |
| Bedrooms | The corner by the door, so the window sits on a side wall, not straight ahead | Shooting straight at a bright window leaves the room dark around it. |
| Bathrooms | The doorway, angled off the mirror | This is where a wider lens earns its place: small bathrooms are the room you usually can't step back from. Check you're not in the mirror. |
How do you frame a listing photo so it still works as a Reel?
Keep the room's main feature near the middle of the frame. A vertical 9:16 crop of a 3:2 landscape photo keeps only its middle 37.5% (42% of a 4:3 photo), so anything on the outer thirds is gone in the vertical cut.
Shoot every listing photo landscape, because that's what the MLS gallery is built for. But the same photos end up on surfaces with other shapes. Meta's ad specs give Instagram Reels a 9:16 ratio and Instagram feed images a 4:5 ratio. Your own photos have a shape too (an iPhone lets you choose 1:1, 4:3 or 16:9). The table covers the two landscape shapes, 3:2 and 4:3, and you don't need to know which one yours is: the rule below works for both. The arithmetic for a crop taken from the middle of the frame, keeping the full height:
How much of the width survives a center crop
| Your photo | 4:5 feed crop | 9:16 Reel crop |
|---|---|---|
| 3:2 | 53% of the width | 37.5% of the width |
| 4:3 | 60% of the width | 42% of the width |
Worked out as the crop's width-to-height ratio divided by the photo's: 9:16 is 0.5625, and 0.5625 ÷ 1.5 = 0.375.
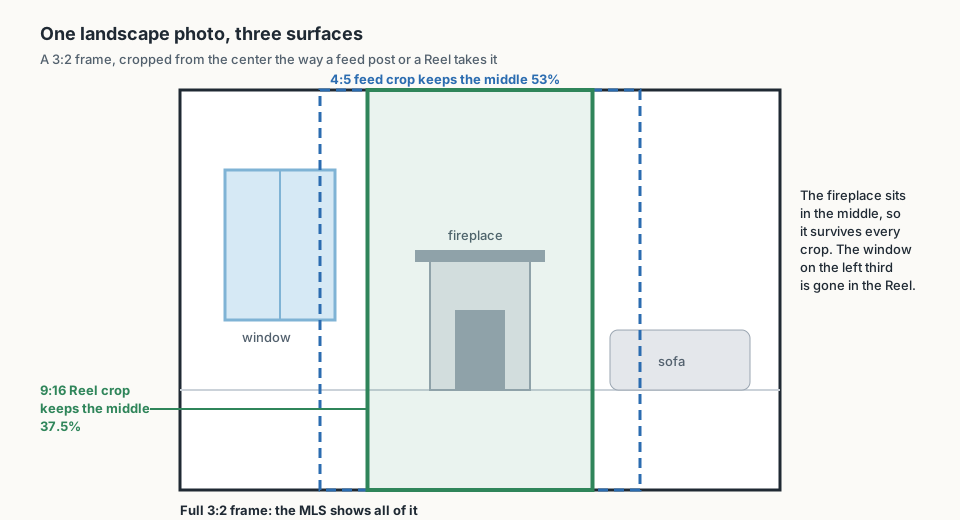
Illustrative diagram, not a real listing: what each crop keeps from one landscape photo.
Android lets each phone maker crop app icons to its own shape, a circle on one phone and a rounded square on another, so Google tells designers to keep the logo inside the middle of the icon that every mask shows. A listing photo gets the same treatment from every surface it lands on. Frame it so the part that matters is the part every crop keeps.
In practice that means three habits. Put the fireplace or the island in the middle third, not on a third line. On the straight-on front exterior, where the whole house has to fit, center the front door, so the vertical cut is the entry rather than a corner of the roof. And check a shot before you move on by covering the left and right thirds of the screen with your fingers: if what's left still says what the room is, the photo will survive a vertical crop.
Two honest limits. Some listing videos pan across a photo instead of holding a center crop, and then the edges do get seen; centering the feature costs nothing in that case and saves the shot when the crop is fixed. And centering is a choice for the main rooms, where a fireplace or island in the middle reads as the room's anchor in the full frame too. For detail shots that won't go vertical, frame them however looks best. Our guide to Instagram Reels for property listings covers what happens to those photos next.
What should you do with the photos after the shoot?
Cut the set down to the strongest 20 to 30, upload them in gallery order with the front exterior in slot one, and export to your MLS's limits. Then reuse the best five everywhere else.
Culling is where the 40-photo shoot becomes a 25-photo gallery. Keep one frame per line of the list, and delete near-duplicates rather than uploading them, because three kitchen shots from the same corner give a buyer nothing the first one didn't. Export landscape JPEGs at the size your board asks for. Our guide to MLS photo requirements has the export spec and the content rules boards fine for, and NWMLS's guide allows no people or pets in any photos, including your reflection in a mirror.
Then pick five to carry the listing everywhere else. Ours would be the front exterior, the living room wide, the kitchen wide, the primary bedroom and the one detail, the same set our list of which listing photos to feed into a video starts from.
Get three videos out of the same shoot
Your best five photos are also the raw material for listing video. Dunphy turns them into a Spotlight for the listing card, a Highlight Reel for social and a Cinematic Tour for the listing page, without a second visit to the house.
The front goes up first. The rest of the gallery follows it in the order a buyer walks the house.
Frequently asked questions
Should I hire a photographer or take listing photos myself?
What is the rule of 3 in real estate photography?
Should sellers be home during listing photos?
Dunphy is the AI marketing agent for real estate listings. You planned the shoot around the gallery. Dunphy turns the same photos into the right video for the listing card, the social feed and the listing page. Photos in. Video out.

Written by
Matthew JohnCo-founder & CEO, Typito AI
Co-founder and CEO at Typito AI. I've been dabbling with video storytelling for 15 years and every day on the journey has been exciting. At Typito we're building Dunphy — the AI video agent for real estate — alongside the broader Typito video stack. Writing here about real-estate marketing, video, and integrity in AI-generated content.